. Advertisement .
..3..
. Advertisement .
..4..
Nowadays, React is one of the amazing front-end libraries that makes it popular among programmers and developers. It has become an important library that is used to create front-end applications, and that’s the reason it is widely used to create React apps with TypeScript.
TypeScript is a programming language that is strict and makes the JavaScript codes evidently predictable. It helps the developer predict the behavior of products rather than just creating products where they can’t see the behavior.
Creating React app with Transcript can make the application prediction as all the errors can be caught during compilation (runtime). Check out how to create React app with TypeScript
How to Create React App with TypeScript
Now that you know the importance of react app using TypeScript, let’s take a step-by-step process to create react app
Setup React App Using TypeScript
To setup, a code will be added for bootstrapping your application
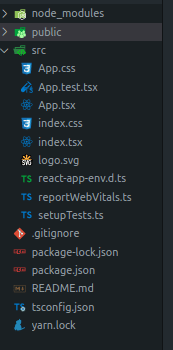
npx create-react-app todo-app --template typescriptwith this command and a react typescript application will be created. After this, you can just normally set up the server. Your app structure is like
......... ADVERTISEMENT .........
..8..

After this, you need to test if everything is working correctly. Run the app to make sure its working fine by using this code
npm start #or yarn startConverting an Existing App to TypeScript
If you already have a create react app written in JavaScript, then you just need to run the command to make it run in TypeScript. Check the code
# with NPM
npm install --save typescript @types/node @types/react @types/react-dom @types/jest

# with YARN
yarn add typescript @types/node @types/react @types/react-dom @types/jest
Rename the file extension from ‘.js’ to ‘.tsx’. So, your file name that was ‘index.js’ will become ‘index.tsx’.
Create tsconfig.json
You need to create the ‘tsconfig.json’ file in the root directory of the project just where you have your ‘package.json file. You can do with these settings
{
  "compilerOptions": {
    "target": "es6",
    "lib": ["dom", "dom.iterable", "esnext"],
    "allowJs": true,
    "skipLibCheck": true,
    "esModuleInterop": true,
    "allowSyntheticDefaultImports": true,
    "strict": true,
    "forceConsistentCasingInFileNames": true,
    "noFallthroughCasesInSwitch": true,
    "module": "esnext",
    "moduleResolution": "node",
    "resolveJsonModule": true,
    "isolatedModules": true,
    "noEmit": true,
    "jsx": "react-jsx"
  },
  "include": ["src/**/*"]
}
It is an important thing to remember that the file name should be in ‘.tsx’ extension having JSX code instead of the ‘.ts’ extension.
Once you add the code, don’t forget to restart the development server and the IDE.
Use Type Assertion
You will get errors that need to be solved. When you created the application root, use a type assertion. For instance, the ‘index.tsx’ file.
const root = ReactDOM.createRoot(
  document.getElementById('root') as Element
);
With this code, you can get rid of assertion errors.
Conclusion
Creating react app with TypeScript has been discussed in step-by-step-process in a simple way to help beginner developers understand the concept. With the code structure, you can easily create react app.
I hope you code well!
Drop down the message in the comment section if you have any queries!

Leave a comment